Coconut Cake- Happy Valentine's Day!
Ingredients
- Sweetened flaked Coconut - 1¼ cups ( for garnishing the cake)
For making cake
- Butter, unsalted and slightly melted- 2 sticks or 1 cup
- Sugar- 1½ cups
- Eggs, large- 3
- All-Purpose flour - 2¼ cups
- Baking powder- ¾ tablespoon
- Heavy cream - ¾ cup
- Pure Vanilla extract - 2 tsp
For making filling
- Heavy cream or half and half cream - 1 cup
- Sugar - ¾ cup
- Butter - ¼ cup or ½ stick
- Corn starch - 2 tbsp
- Vanilla extract - 1 tsp
- Cold water - 1 tbsp ( to dissolve corn starch)
- Sweetened flaked coconut - 1 cup
For making whipped cream
- Heavy cream - 1 cup
- Powdered sugar - 3 tbsp
Instructions
Step: 1
- Pre heat the oven to 375 F.
- Spread 1¼ cups of sweetened flaked coconut on a baking sheet lined with parchment paper.
- Bake the coconut for 5 minutes till it turns light golden in color.
- After the coconut turns golden in color, remove from the oven and keep aside.
Step: 2 Making the cake batter
- Preheat the oven to 325 F
- Grease a 10-inch round pan with butter and keep aside.
- In the bowl of a stand mixer fitted with the paddle attachment, cream together butter and sugar at speed 2 until it turns smooth and fluffy for about 4 to 5 minutes.
- If you don't have stand mixer, use electric hand mixer to cream butter and sugar.
- Add eggs one at a time and beat until creamy, occasionally scraping down the sides of the bowl using a spatula.
- In a bowl, combine flour and baking powder together.
- In a different bowl, mix together the heavy cream and vanilla extract.
- With the stand mixer on low speed, add flour mixture, alternating with cream mixture, beginning and ending with the flour, beat until just combined.
- If you don't have stand mixer, use electric hand mixer instead.
- Pour batter into the grease cake pan and bake until a tooth pick inserted into the center of the cake comes out clean, for about 45 minutes.
- After 45 minutes, if the center of the cake is not well done, place the cake on the upper rack of the oven and bake for a few more minutes.
- Let the cake cool down completely.
- Gently run a knife through the sides of the cake and cover the cake pan with a plate.
- Flip the pan and tap the pan gently, the cake will fall onto the plate smoothly.
- Using a sharp knife, very carefully cut the cake into two halves and keep aside.
Step: 3 Making the filling
- Combine heavy cream or half-half cream, sugar and butter in a saucepan and heat it stirring the mixture frequently.
- In a bowl, combine corn starch, vanilla extract and cold water together till the corn starch dissolves completely.
- Pour the corn starch mixture into the cream mixture, stirring it frequently.
- Let it come to a boil and simmer it for a few minutes.
- When the mixture starts to thicken, remove from the heat.
- Grind the sweetened flaked coconut slightly in a blender or food processor.
- Add the coconut into the cream filling and combine well.
- After the filling cools down, chill it in the refrigerator for half an hour.
- Before using the filling, place the filling in a stand mixer bowl with the paddle attachment and beat until creamy and smooth for 4 minutes and keep aside.
Step: 4 Making whipped cream
- Place the heavy whipping cream and powdered sugar in the stand mixer bowl with the wire whip attachment.
- Whip it at high speed ( speed 8), till soft peaks forms.
- Don't over whip as the cream will curdle.
Step: 5 Assembling the cake
- Spread the prepared cream filling on top of one of the cake halves.
- Place the other half over it and gently press down.
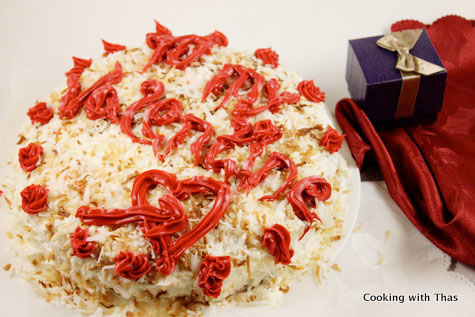
- Cover the cake with whipped cream and sprinkle the top generously with roasted sweetened flaked coconut.
- To decorate the cake, I used Betty Crocker decorating Icing which came with the design tips as well.
- Refrigerate and chill the decorated cake for about 4 to 5 hours before cutting it.
- This cake will last for 5 days when kept in air tight container in the refrigerator.
- I can guarantee one thing that this cake is going to finish in just a matter of seconds.
Notes
For making 4 or 6 layered cake, just double the amount of ingredients.
Don't skip the filling and the roasted coconut sprinkled over the cake, both of these made the whole difference.
Don't skip the filling and the roasted coconut sprinkled over the cake, both of these made the whole difference.
Recipe by Cooking with Thas - Smart Cooking, Smart Living at https://thasneen.com/cooking/coconut-cake-happy-valentines-day/